We haven’t heard of much going on with JIRA Portfolio from users lately, and what we have heard isn’t that great. Some common grievances are:
- Pricing
- That while Portfolio is good for planning future work, it’s not so good for work in progress
- Difficulty intergrating with JIRA Agile
- Lack of support for hierarchy of issues (i.e. estimates from sub-tasks to reflect tasks)
So now for some good news – in this blog I plan to talk about Portfolio’s new live plan feature.
The newer versions of Portfolio come with a Live Plans feature. This is currently in LABS mode, which basically means that it’s still under construction and isn’t enabled by default (if you want to enable it yourself, this will help.)
The main feature of live plans is to integrate with JIRA Software seamlessly, i.e. create a plan straight from the boards you have already created for your project in JIRA Software.
Live plans in JIRA Portfolio are dynamic, so any changes made on the board will automatically reflect the plan, and vice versa. However, if you want to push changes from Portfolio to JIRA Software, you have to do this manually, as Portfolio is where you play around with plans to find out the dates you can deliver your software. The last thing that you want here is for dummy data to be pushed to live issues.
Before you can push your changes to live JIRA issues, the Review Changes dialogue enables you to see the changes that will be made to the issues before committing to them.
Furthermore, the new hierarchy model allows you to create as many levels as you like. And yes, the estimates reflect the top level of your hierarchy and feature the total number of levels you have created (whoop whoop!).
The good thing about Portfolio is that it allows you to create a virtual plan. This enables you to glimpse into the future and see what your project will look like at the start of the process, where you have no data whatsoever in JIRA Software. Once the plan is created and you are happy with it, it can be pushed to JIRA Software as actual issues. Oh, and now you have your live plans, you have the ability to synchronise, too.
I’ve been banging on about live plans forever now – let me show you how they actually work.
Step 1 – Enable live plans
The first step is to enable the live plan. Doing this is actually quite simple. If you are using JIRA 6, then you need JIRA 6.3 or higher and JIRA Agile 6.7.12 or higher. Ideally you want to have JIRA 6.3.8 if you are using JIRA 6.3.x, as this has a lot of bug fixes within live plans
For JIRA 7, you need to have version JIRA Software 7.0.5 or higher.
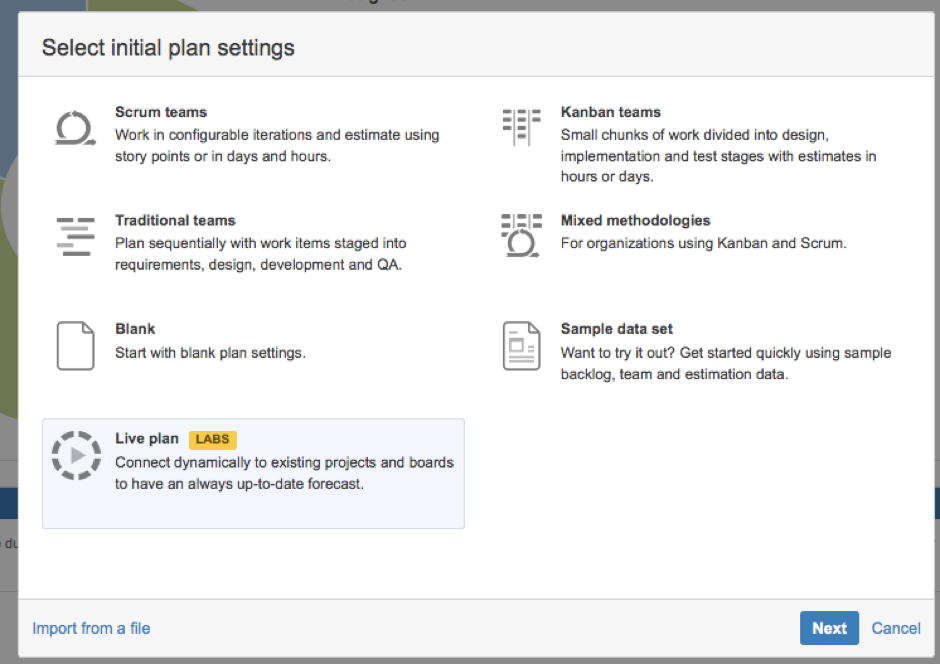
To enable live plans, go to Portfolio > Administration and enable Portfolio LABS to access and grant the permission to a group. Once this has been enabled, you will see that a live plan template has been created.
Step 2 – Create a JIRA portfolio plan from a board or project
At this stage you are ready to create new live plans in JIRA Portfolio by choosing Live Plan from the template. As mentioned above, this template will enable you to create a dynamic plan which updates JIRA Software when you a) push your updates from Portfolio or b) update Portfolio from JIRA Software updates.
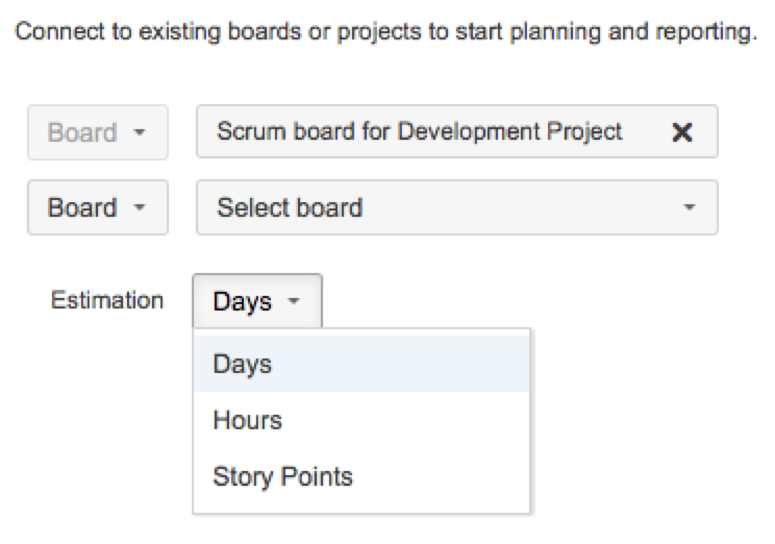
If you don’t already have issues created, it’s fine – you will need to create a board or connect the plan to the project or a filter.
During the creation of a plan, you can choose the type estimation to be either in days, hours or even story points. This depends entirely on how you work in your organisation.
Step 3 – Have some fun!
Now it’s time to play around with live plans in JIRA Portfolio and have some fun. If you don’t have any issues in the project, don’t worry! You can start by creating a virtual plan, seeing where the project will take you and committing to the changes to create actual JIRA issues for the project. It’s that simple – you have the Import Issues function to enable you to import pre-created issues.
There are a few things you may want to explore in the synchronisation options. To go to that setting, click on Plan > Configure. Below is the screenshot showing you what you can keep in sync.
If you have any further questions, don’t hesitate to add a comment to blog and I’ll get back to you as soon as I can. I hope this helps you with your plans… time to get stuck into live plans in JIRA Portfolio, people!


