Valiantys Software is now Elements, a Valiantys company
We might have changed our name, but we’re the same team behind Elements. The new Elements brand and visual redesign reflect our identity as a software publisher and are a reminder of the connectivity between our different apps. As part of the rebranding, our products have new names: nFeed is now Elements Connect, Exocet is now Elements Copy & Sync, Elements is now Elements Checklist, and Spreadsheets is now Elements Spreadsheet.
To read more, check out our announcement from March 20, 2019.
Asset Management software has now become key to organisations of all sizes. Despite their performance however it is common that these applications do not always fully integrate to a company’s Information System. For this reason, when one of your internal stakeholders is calling you through Help Desk, you often have to manually look for information in your Asset Management tool. Plus, you may require further information from your stakeholder such as Machine Number, Machine ID etc., which is, let’s face it, quite tedious and can increase your chance of mistakes.
To reduce the occurrence of the above example and increase efficiency thus saving everyone’s time, I’m pleased to suggest a method where you connect your Asset Management tool (GLPI in our example) to your JIRA Help Desk thanks to Elements Connect (formerly nFeed).
Connect GLPI and JIRA in 4 steps
In the following example, the goal is to get the end-user machine number and regenerate the URL which will enable you to directly access the GLPI page.
We will use two fields for this: “Machine Number” which will display the end-user machine’s ID and “Machine Information” which will display a link to the related machine page in GLPI.
Step 1: Declare your external database
Declare your external base in the .xml server file located in the conf Tomcat directory hosting your JIRA.
In the “context” tag, add:
Once this is done, restart your JIRA.
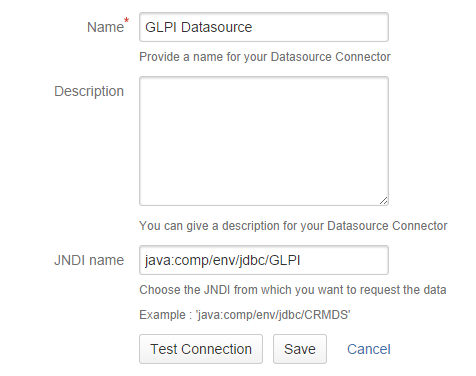
You will then need to add this external base in your Elements Connect configuration.
To do so, reach “Datasources connectors” tab and click on “Add Datasource Connector”.
Step 2: Create a custom field
From your JIRA admin console:
- Create “Machine Number” custom field as an Elements Connect type field so that the machine number can be displayed
- Create “Machine Information” custom field as an Elements Connect type so that the machine URL can be displayed in GLPI
Step 3: Configure fields in Elements Connect
In the Elements Connect configuration panel, click “Configuration” tab and then “Create a configuration” button for you to access Elements Connect fields that haven’t been configured as yet.
“Machine Number” field configuration
You would first select GLPI data source in the first tab and then choose the display mode in the second tab (read only in this example).

Type the following request in the “query” field: we want to get the GLPI machine number linking to the stakeholder reporting the query (or the one of the current machine user if the previous field is blank).
The column 0 will be stored as a key and will be displayed in the related page.
“Machine Information” field configuration
You will first select GLPI data source in the first tab and then choose the display mode in the second tab (read only in this example).

Type the following request in the “query” field: we want to get the GLPI machine ID for the user reporting the query.
The column 0 will be stored as a key and will be displayed in the related page.
For you to display the ID as a link to GLPI, you need to configure the display mode.
To do so, click “Configure”:

Then type the start of the GLPI URL, the end of the URL will be suggested thanks to the ID of the end-user machine:
Example:
Do this operation again for the “Field Display” tab:

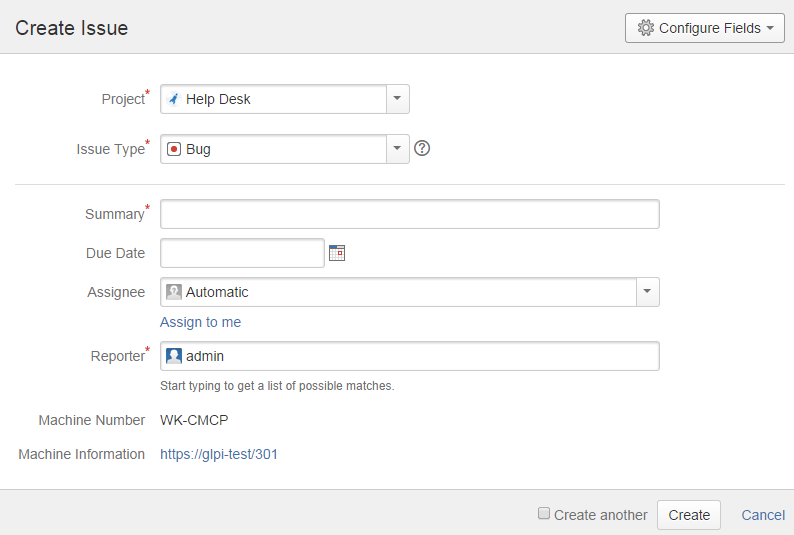
Step 4: Display your field
The field should then be seen on your screen. Once the field is displayed, you will have the GLPI data which will be displayed dynamically in your JIRA Help Desk.
Creation mode:
Visualisation mode:
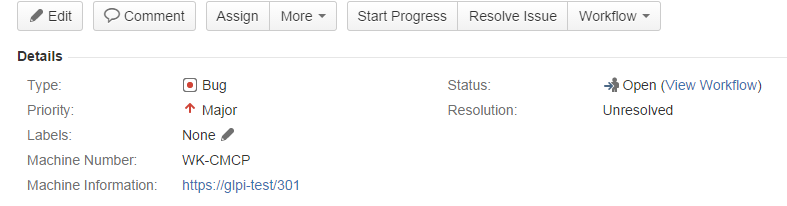
The user will be redirected to GLPI when clicking the link, how amazing!

Your JIRA and GLPI are now fully integrated!
Now you know how powerful Elements Connect is by integrating your Help Desk with your Asset Management tool. It will create ease and efficiency for your stakeholders to report queries whilst ensuring a better data integration between your two systems.
Is this what you have been looking for?
Try Elements Connect for free!